Add Plantings to Beds
Add plantings
Now that you have a garden with at least one bed, you can add plantings. You add plantings to your garden by navigating into the Details Screen for that garden by tapping on the +Planting floating button to open the Create Planting Screen.
Next, fill out the form in the Create Planting Screen Note that you don't need to fill out every field. The required fields are marked with a red "*".
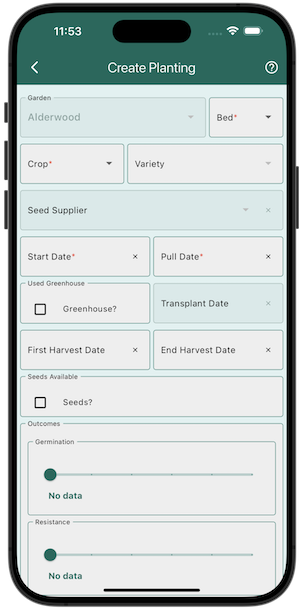
- Garden: This is autopopulated for the garden you chose Details for. If you want to add a planting to a different garden, you can navigate back using the arrow on the top left of the screen and choosing a different garden's Details page.
-
- Crop: Choose the crop you are planting. If you don't see the crop you want, hit the + icon to add a crop to the database.
-
- Variety: Choose the variety you are planting. If you don't see the variety you want, hit the + icon to add a variety to the database.
- Bed: Choose the bed you want to add this planting to. If you don't see the bed you want, navigate back to Garden Details screen by tapping < icon to go back. Then add a bed using the floating + icon at bottom of the screen.
- If you leave the varieties field bank, it will automatically be labelled as "unknown." This can be changed to specify a variety later, or left as unknown if the variety is actually unknown.
- Start Date: Add the date you expect to plant your seeds. You can update this to the actual date the seeds were planted when you complete that task.
- Pull Date: Add the date you expect to pull your crop. You can update this to the actual date the crop was pulled when you complete that task.
- Transplant Date (optional): If you are starting your crop indoors, in a greenhouse, or using store bought starts, you can add the date you transplanted the crop into the garden here. You can add your expected transplant date if you want a transplant task to populate in your Tasks Screen. You can update this to the actual date the crop was transplanted when you complete that task.
- First Harvest Date (optional): Once you have your first harvest, you can add the date here. It is recommended to add an expected date of first harvest so that a harvest task populates in your Tasks Screen. You can update the task if your estimate is off, and by completing the task you record the actual date of first harvest.
- Last Harvest Date (optional): If you have a crop that you expect to save seeds from and has some time between the final harvest and seed collection time, you can add the date you expect to stop harvesting here. You can update this to the actual date the crop finished harvested when you complete that task. Otherwise, the Pull Date is assumed to be the End Harvest Date.
- Notes: Add any notes you want to remember about this planting. This could be the source of the seeds, the variety, or any other information you want to remember.
- Outcomes: Complete this section as the crop grows. You can update this section at any time.
- Germination: How well the crop germinated.
- Resistance: How well the crop resisted pests and diseases.
- Flavor: How tasty the crop was.
- Yield: How well the crop produced.
- Appearance: How beautiful the crop was.
You can update this section at any time by navigating to the Timeline Screen, tapping the planting bar, and selecting the pencil icon at the top menu. See Outcomes for more information.
Hit Submit and you have successfully added your first planting. Continue adding plantings or add more later.
Troubleshoot planting date errors
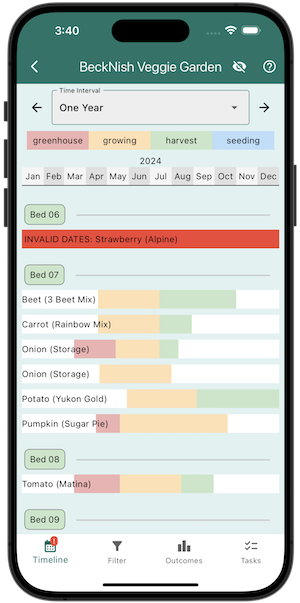
A planting timeline error can be created when a user completes tasks for a planting out of order. For example, if you complete the harvest task before "start" or "transplant" tasks, the system will throw an error. The error will make the planting bar red and display an "Invalid dates" error message.
To fix this error, navigate to the Update Planting screen and edit the dates to follow this rule:
Start date ≤ Transplant date < First Harvest date < End Harvest date ≤ Pull date