Your First Garden
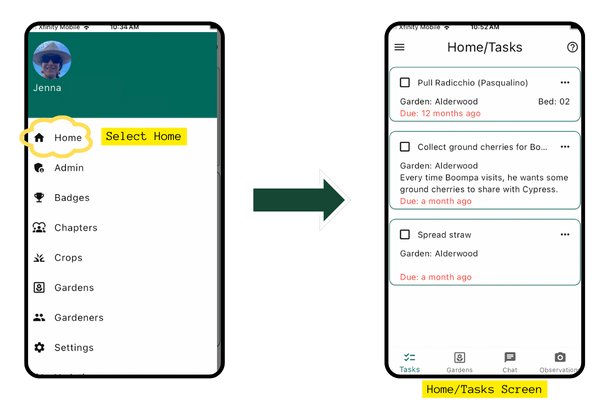
Find your home screen
To add your first garden navigate to the Home Screen. You can always access the Home Screen by tapping the menu icon ![]() at the top left of your screen. Tap on Home to access your gardens, tasks, observations, and chat rooms.
at the top left of your screen. Tap on Home to access your gardens, tasks, observations, and chat rooms.
Add a garden
By tapping Home you will be now be in your Tasks Screen.
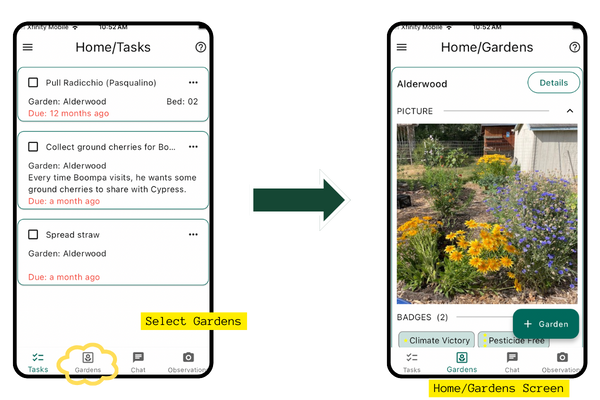
In the bottom menu bar tap Gardens. You'll see a large +Garden button onn the bottom right of the screen.
Tap +Garden to open the Create Garden Screen.
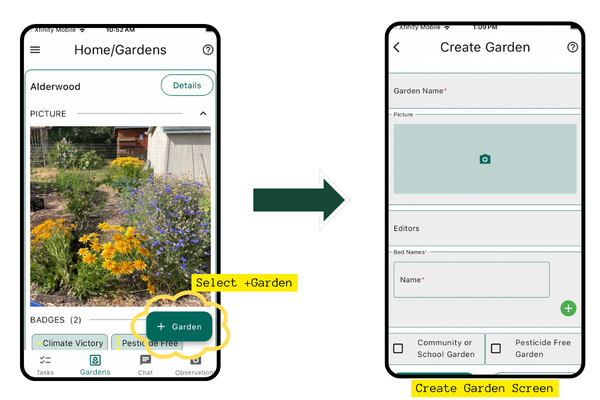
Fill out the form in the Create Garden Screen
- Name: Give your garden a name. This name is public to others.
- Picture (optional) add a picture to be associated with your garden. This could be a garden map or photo.
- Editors (optional): If there are other people who help complete tasks in your garden you'll want to make them an editor. Add their email and they'll get an invite.
- Bed Names: Add the names of your garden beds. Beds can represent literal garden beds, pots/containers, a greenhouse, or other locations where you grow food. You can come back and add more beds at any time. Bed names must be:
- 5 characters long or less
- Made of letters, numbers, and spaces. No special characters.
- You don't need to include the word "bed", we've done that for you!
- Community or school garden? Check this box if this is a community or school garden. There are special badges for gardeners that participate in these group efforts!
- Pesticide free garden? Check this box if you are committed to not using pesticides in your garden. There are special badges for gardeners who choose to be pesticide free.
Hit Submit and you are ready to start adding plantings.
Add plantings
Now that you have a garden with beds you can add plantings. You can add plantings to your garden by navigating into the Details Screen for that garden.
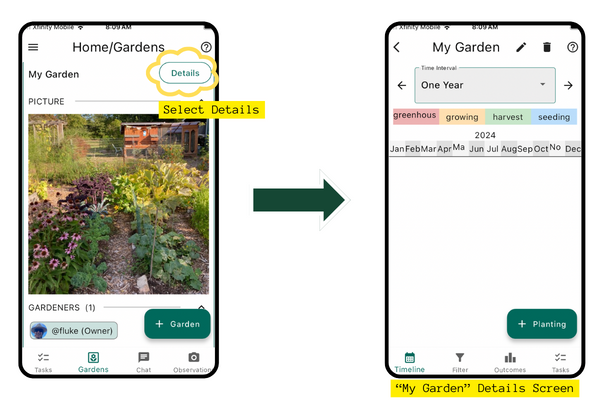
Select +Planting to open the Create Planting Screen.
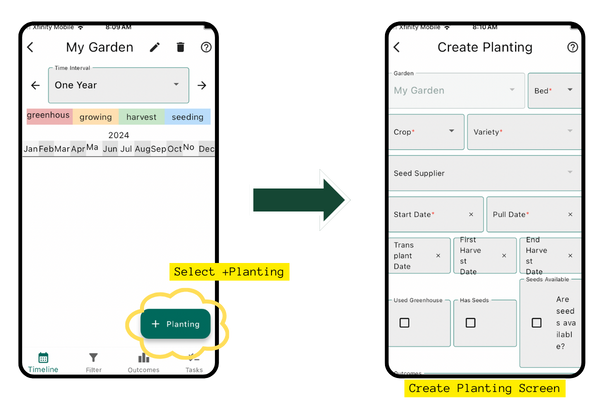
Create Planting Screen
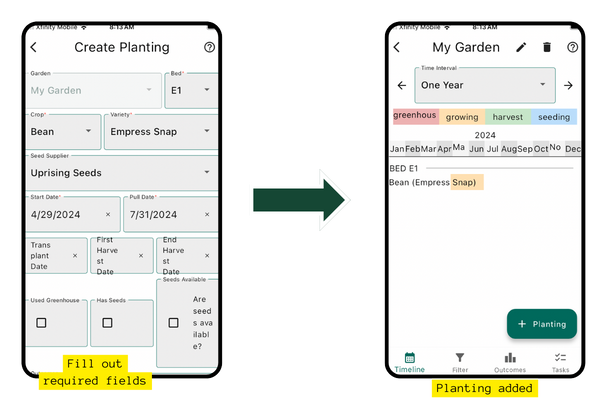
Fill out the form in the Create Planting Screen Note that you don't need to fill out every section, only the ones marked required with an *
- Garden: This is autopopulated for the garden you chose Details for. If you want to add a planting to a different garden, you can navigate back using the arrow on the top left of the screen and choosing a different garden's Details page.
- Bed: Choose the bed you want to add this planting to. If you don't see the bed you want, you can add it by navigating back one screen to the My Garden Details Screen and selecting the pencil icon at the top of the screen.
- Crop: Choose the crop you are planting. If you don't see the crop you want, you can find instructions for adding crops in the Add Vendors, Crops, and Varieties section.
- Variety: Choose the variety you are planting. If you don't see the variety you want, you can find instructions for adding varieties in the Add Vendors, Crops, and Varieties section.
- Seed Supplier (optional): If you want to track where you got your seeds from, you can add a seed supplier. If you don't see the supplier you want, you can find instructions for adding suppliers in the Add Vendors, Crops, and Varieties section.
- Start Date: Add the date you expect to plant your seeds. You can update this to the actual date the seeds were planted when you complete that task.
- Pull Date: Add the date you expect to pull your crop. You can update this to the actual date the crop was pulled when you complete that task.
- Transplant Date (optional): If you are starting your crop indoors, in a greenhouse, or using store bought starts, you can add the date you transplanted the crop into the garden here. You can add your expected transplant date if you want a transplant task to populate in your Tasks Screen. You can update this to the actual date the crop was transplanted when you complete that task.
- First Harvest Date (optional): Once you have your first harvest, you can add the date here. You can add your expected date of first harvest if you want a harvest task to populate in your Tasks Screen. You can update this to the actual date the crop was harvested when you complete that task.
- End Harvest Date (optional): If you have a crop that you expect to save seeds from and has some time between the final harvest and seed collection time, you can add the date you expect to stop harvesting here. You can update this to the actual date the crop finished harvested when you complete that task. Otherwise, the Pull Date is assumed to be the End Harvest Date.
- Used Greenhouse: If the seeds were started in a greenhouse or other climate controlled scenario, like inside with grow lights, check this box.
- Has Seeds: If you saved seeds from this crop, check this box.
- Are Seeds Available: If seeds are available for others in the chapter, check this box.
- Outcomes: Complete this section as the crop grows. You can update this section at any time.
- Germination Rate: Add the percentage of seeds that germinated.
- Plant Health: Add the health of the plant. You can add a note if you want to add more detail.
- Pest Pressure: Add the pest pressure on the plant. You can add a note if you want to add more detail.
- Harvest: Add the amount of harvest you got from the plant. You can add a note if you want to add more detail.
- Outcomes: Rate the crop on it's qualities to inform future garden planning and add information to the chapter database. You can update this section at any time. See Outcomes for more information.
Hit Submit and you have successfully added your first planting. Continue adding plantings or add more later.
Explore your garden
At the bottom of the Garden Details Screen you have 4 options: Timeline, Filter, Outcomes, and Tasks.
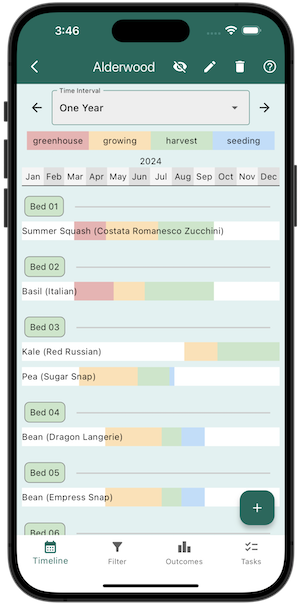
Timeline Screen
The Timeline Screen shows you all the plantings in your garden for a section of time (one year, six months, three months, or one month). You can change the timeframe using the Time Interval drop down menu. Use the left and right arrows to move forward or back in time. You can also add a planting from the Timeline Screen by tapping the +Planting button on the bottom right of the screen.
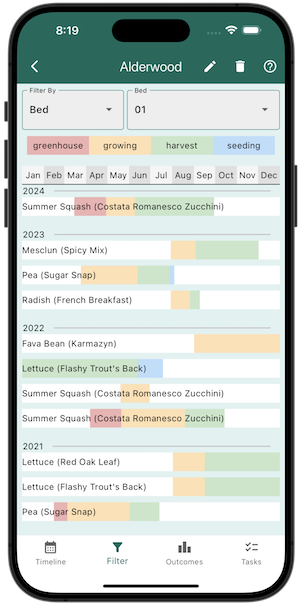
Filter Screen
The Filter Screen allows you to filter the plantings in your garden by crop, bed, family or variety.
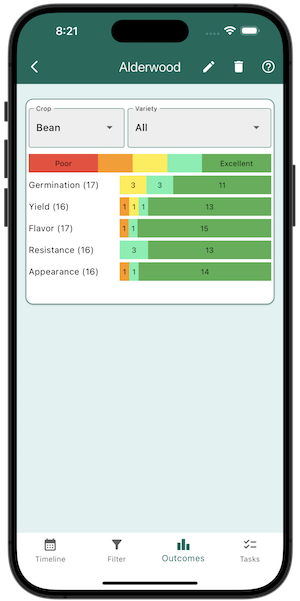
Outcomes Screen
The Outcomes Screen shows you the outcomes of all the plantings in your garden. You can filter the outcomes by crop or variety. Learn more about outcomes in the Outcomes section.
Tasks Screen
The Tasks Screen shows you all the tasks you have to do in your garden. You can add a task from the Tasks Screen by tapping the +Task button on the bottom right of the screen. Learn more about tasks in the Tasks section.
